Since a few of you expressed interest in how I did the dream-like photos in one of my recent posts, I have an easy step-by-step method to share with you. I figured this out on my own one day, so please note that there are many different ways to accomplish something in Photoshop, and this is just my way. I can navigate around in PS, but am self-taught and still have much to learn.
I can’t emphasize that enough.
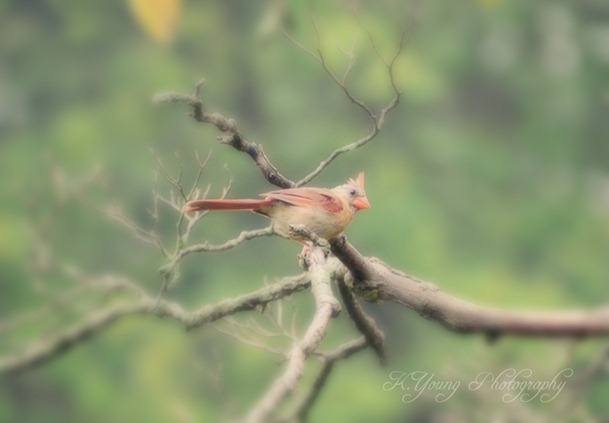
Here’s the finished version of the image I will be working on for you:
I took it this morning while having my coffee outside on the patio. I love the dreamy quality.
I use a PC and the CS5 version of Photoshop. The first thing I do is to open the image I want to work on, then make a copy of it. Never work on an original image. After I make a copy, I fool around with it to get the color and the contrast the way I want it. For this image, I started with Red Leaf Studio’s Velvet Sage action, lowering the opacity until I liked what I saw.
Now it’s time to get the blur. Have your photo open in PS.
STEP 1: Copy the background image.
To do this: In the layers palette (bottom right), click on the thumbnail of your Background layer and drag it on top of the ‘Create a new layer’ icon. It’s the second over from the right at the very bottom right and looks like two rectangles – one on top of the other.
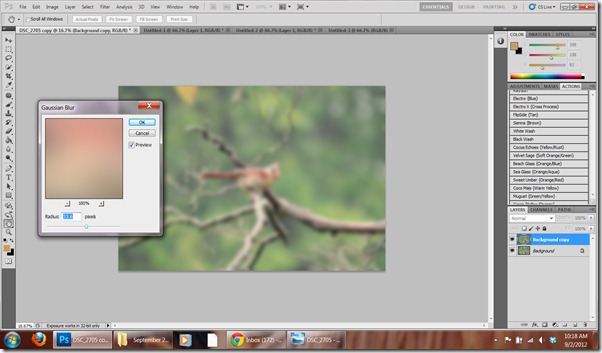
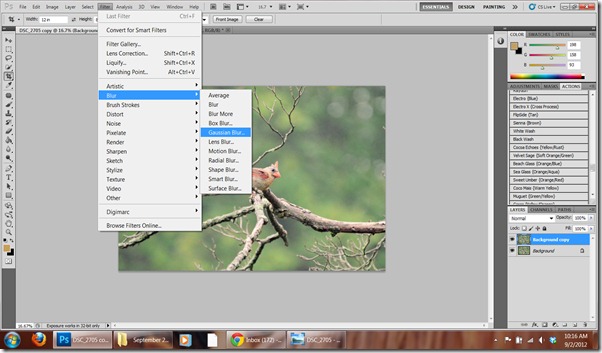
STEP 2: Set the Background copy to Gaussian Blur.
To do this: With your Background copy thumbnail highlighted, go to Filter > Blur > Gaussian Blur.

STEP 3: Set the amount of blur desired.
To do this: Use the slider to get the desired effect, then hit OK.
STEP 4: Add a layer mask to remove blur.
To do this: In the layers palette, with your Background copy thumbnail highlighted, click onto the ‘Add layer mask’ icon. It’s the third from left and looks like a rectangle with a circle in the middle. Then, using a large soft black brush, with your opacity and flow set low (mine was at 17%), gently brush off the Gaussian blur from your desired focal point.
You will find your brush in the toolbox palette (far left of the screen). I used ‘soft round pressure opacity’. Then I changed the flow and the opacity in the bar above.
Look at the layers palette (bottom right corner). As you brush off the layer mask in the Background copy, you can see how you’re progressing as the area being removed turns gray on the thumbnail. If you make a mistake, just change your brush color to white and paint over the area you want to correct. Don’t forget to change back to black to finish.
At this point, I make my brush smaller and really go over the area that I want to disappear so that the object is more clear (in this case, the bird). If you like, you can raise the opacity and flow a little, or you can just keep going over the same spot. The longer you work your brush over it, the darker the spot will appear in the thumbnail.
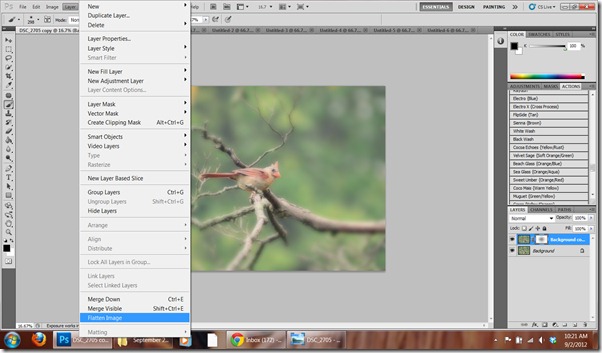
STEP 5: Flatten the image.
To do this: At bar across the top, Layer > Flatten Image.
At this point, I ran Florabella’s Sweet Color action, and lowered the opacity considerably. Then, because I was publishing this photo on my blog, I duplicated the image. I never use the original image on my blog page, always resizing to a smaller width, and often using a watermark.
To get the watermark this time, I simply typed it. To do this: On the duplicated copy , I created a new layer (in layers palette bottom right) and using the Horizontal type tool in the tool palette (far left), I typed my name in Freebooter Script, lowered the opacity, then moved it where I wanted it.
Then I set the image size to 800 pixels width. I hit control / alt / I – but it can also be done by going to the top bar and selecting Image > Image size.
Hope this helps. Seasoned pro’s will know of a better way to do this, I’m sure. But this works for me and I hope it does for you, as well.
Enjoy ~


![123 Signature[5] 123 Signature[5]](https://blogger.googleusercontent.com/img/b/R29vZ2xl/AVvXsEjeGdGuddTiF4cQCYB-NX_NeEdJWeC5Gw5YLnuRzoM7cRPVw0YrUW2UfDFx7fXXyy1xxXSTJ-hH9_jgjU3Psfq1WcyeJg982spsK8u3sHeA9IK9VcH_c84ViwxeF-akiRK76DSv4NXbvxo/?imgmax=800)

18 comments:
Well, I'm not a seasoned pro, I'm just obsessed with Photoshop :~) I think your technique is excellent, Kate!
P.S. The other day I commented right after you on a Shadowhouse Creations post :~)
Wonderful photo and tutorial ! Ken AKA Papa here has the CS5 version as well , he started out with the other versions years ago then every time a new one came out he would up grade it and he is showing me how to use it . I am still getting used to Light room as well . He to is self taught , he also learns from some Photoshop tutorials then gives them a try , layer upon layers I have no idea of all that yet lol. Papa takes raw photos as he finds that better to work with for him ! He always says to me don't worry you can always undo what ya did on these programs I being me get all flustered when I click on something and it doesn't work out I take JPEGs . I guess you can teach an old dog new tricks I tell him lol ! Have a good day !
No photoshop for this ol' gal. Too blonde. Or is it too grey?
First of all, I really like your photo.
And second....I'm sure your tutorial is great, but PS requires much more concentration than I seem to have at this age:-)
Ok... I din't really read all that b/c my brain hurts from to much stimulation from busy chaotic days and I'll never even own photoshop probably.... However, I enjoy the end product!! And I just want to say that you are on a roll with your posts, girlfriend!
Thank you so much for taking us through your process! I'm going to save this and hope to be able to play around with a photo in the next week.
Thanks for the tips! I learned something new!!
I've always found PhotShop SO complicated outside the basics so any tips gratefully received. I used to work for Getty Images in London and used it much more often then, but absence makes the expertise dwindle massively!
Love the picture by the way....
Thanks, Kate! I'm self-taught, too. Well, read this technique there & that tip here & other processes in a dozen books, articles...you get the pic. Definitely non-linear learning. But it was really a zen-like experience to sit down & just experiment & see where a few clicks would take me.
I've gotten away from the PC & Photoshop since falling in love with my iPhone & app-editing on Mac devices. I've been thinking I need to visit them again soon. I miss all the textures I accumulated, too.
I love the photo
sweet birdie with a fabulous hair do :)
Photoshop makes me feel stupid and often paralyzes me
sadly, i still hate photoshop. i think it's due to my A.D.D. i just can't "stick with it" for any length of time and often, i look at all the steps and literally just zone out.
BUT, so many people love it. i guess it's a good thing we're all different or life would be so boring.....xo
ps....i love this photo !!
PS and i have reached an agreement .. i wont attempt to use it and it wont make me cry ...
Thanks for the info!!!!
She's a real beauty :)
Great tutorial Kate!
No photoshop here for this girl ... maybe some day ... you always do great work with the program.
I might have to try it soon.
strange, your comment link for today (9-11) shows as a pop-up in my browser so I was leary of clicking on it. . . .
love your shots, the geese are my special pals and I so appreciate seeing them so beautifully captured
Aloha from Honolulu
Comfort Spiral
=^..^=
> < } } ( ° >
I admire your ability to teach yourself PS...that's a valuable skill to have and you came by it the hard way too! xo ~Lili
Post a Comment