

I am really getting impatient for Pioneer Woman to get her new Photography Blog up and running. I had thought it would be March 1st, but checking back on some posts she did about it, she actually said it would be around March 1st. And so I wait.
Actually, it's not like I'm sitting here twiddling my thumbs. I got out my Scott Kelby book, The Photoshop CS2 Book for Digital Photographers and like the good student I am (please don't hate me), I'm trying to teach myself. But it's easy with Scott because he's so good at explaining exactly how it's done. It took me a couple of tries to get this down the first time, but now that I've got it, I can't believe how simple this is.
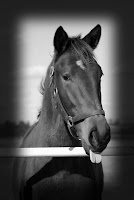
This effect is called Burned-In Edge Effect (Vignetting) and the completed photo is the one at the top of this post. To get it ready, I turned it into B&W and now I'm ready. I couldn't resist choosing this photo because this colt is such a smart alek. He thinks he's so funny. Little does he know that he's being featured in this blog for all the world (read: about 30 people) to see. That should teach him to stick out his tongue at me!
So if you have Photoshop and you'd like to learn this technique directly from Mr. Kelby, here goes:
Step One: Open the photo to which you want to apply a burned-in edge effect. Just so you know, what we're doing here is focusing attention through the use of light ~ we're burning in all the edges of the photo (not just the corners, like lens vignetting, which I usually try to avoid), which leaves the visual focus in the center of the image.
Step Two: Go to the Layers palette and add a new layer by clicking on the Create a New Layer icon at the bottom of the palette. Press the letter D to set your Fforeground color to black, and then fill your new layer with black by pressing Option-Delete (PC: Alt-Backspace).
Step Three: Press M to get the Rectangular Marquee tool and drag a selection about 1" inside the edges of your photo. Then, to greatly soften the edges of your selection, go under the Select menu and choose Feather. When the dialog appears, ener 50 pixels for a low-res photo (or 170 pixels for a high-res, 300-ppi photo), and click Ok.
I used 100 pixels for this shot. Step Four: Now that your edges have been softened, all you have to do is press Delete (PC: Backspace), and you'll knock a soft hole out of your black layer, revealing the photo on the Background layer beneath it. Now press Command-D (PC: Control-D) to deselect and get rid of the dancing dots. Note: If the edges seem too dark, you can go to the Layers palette and lower the Opacity of your black layer. In the example here, I lowered the Opacity to 84%.
 Of course, you should now flatten the image and then save it. If you don't have Photoshop, I'm sorry about this post. It's just that I have this huge desire to spread the happiness. And Photoshop makes me happy.
Actually, it's not like I'm sitting here twiddling my thumbs. I got out my Scott Kelby book, The Photoshop CS2 Book for Digital Photographers and like the good student I am (please don't hate me), I'm trying to teach myself. But it's easy with Scott because he's so good at explaining exactly how it's done. It took me a couple of tries to get this down the first time, but now that I've got it, I can't believe how simple this is.
This effect is called Burned-In Edge Effect (Vignetting) and the completed photo is the one at the top of this post. To get it ready, I turned it into B&W and now I'm ready. I couldn't resist choosing this photo because this colt is such a smart alek. He thinks he's so funny. Little does he know that he's being featured in this blog for all the world (read: about 30 people) to see. That should teach him to stick out his tongue at me!
So if you have Photoshop and you'd like to learn this technique directly from Mr. Kelby, here goes:
Step One: Open the photo to which you want to apply a burned-in edge effect. Just so you know, what we're doing here is focusing attention through the use of light ~ we're burning in all the edges of the photo (not just the corners, like lens vignetting, which I usually try to avoid), which leaves the visual focus in the center of the image.
Step Two: Go to the Layers palette and add a new layer by clicking on the Create a New Layer icon at the bottom of the palette. Press the letter D to set your Fforeground color to black, and then fill your new layer with black by pressing Option-Delete (PC: Alt-Backspace).
Step Three: Press M to get the Rectangular Marquee tool and drag a selection about 1" inside the edges of your photo. Then, to greatly soften the edges of your selection, go under the Select menu and choose Feather. When the dialog appears, ener 50 pixels for a low-res photo (or 170 pixels for a high-res, 300-ppi photo), and click Ok.
I used 100 pixels for this shot. Step Four: Now that your edges have been softened, all you have to do is press Delete (PC: Backspace), and you'll knock a soft hole out of your black layer, revealing the photo on the Background layer beneath it. Now press Command-D (PC: Control-D) to deselect and get rid of the dancing dots. Note: If the edges seem too dark, you can go to the Layers palette and lower the Opacity of your black layer. In the example here, I lowered the Opacity to 84%.

 Of course, you should now flatten the image and then save it. If you don't have Photoshop, I'm sorry about this post. It's just that I have this huge desire to spread the happiness. And Photoshop makes me happy.
7 comments:
LOL, tonight I just started capturing screen shots on how I adjust almost every photo in photoshop or photoshop elements. Saved the before and after pics. I'm getting ready to post it tomorrow after I clean up the screen captures, etc.
I'm going to try your trick. Post away on any photoshop tricks you know. Scot Kelby writes wonderful how to books, doesn't he? I've learned a lot of my stuff from him.
I'm about to break down and get Photoshop for Mac. I never use my PC anymore, and it has my full Photoshop on it. I use Photoshop elements on my Mac right now. I'm ready to have the full Photoshop again.
As long as it is not presets (actions), I can duplicate any tutorial in GIMP. I have done this vinigretting (Here > ) but a different way. I'll have to write it out and post it this Friday or this weekend. My way is easy, too, and can be done in PS or GIMP. :)
Hi Kate,
I'm waiting for Pioneer Woman's photo blog, too. I do have a book about Photoshop, but I find it easier to just experiment. Guess I'm not a follow-the-instructions type. :) Love your photo! What's up with the tongue? Is he looking for a snack? Cute!
xoxo,
Mary
That tongue is adorable :-) Silly horse!
Your a PW "addict" too?! So am I. Well off to bed....have to work tonight and Laci (my dog) is already ticked at me for taking forever getting ready.
We don't have photoshop on our computer but we have a really cool program that does just about all the same things as it. We have all sorts of books and stuff on different programs and digital photography in general but personally I like to experiment.
Post a Comment